Polymer Clay Fan

Free Sculpting Tutorials

Search Results

Sculpting veins

Posted by goregt On April - 3 - 2007

How to sculpt veins in Polymer Clay

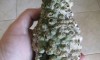
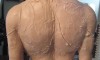
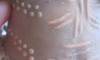
Sculpting veins is one of those things that is technically pretty easy to do but in reality takes some practice to get it down right. I think that the key to achieving well sculpted veins is to make them look like they are sitting right under the skin. I’ve seen a lot of sculptures where the veins appear as if they sit on top of the skin and it really takes away from the realism of the sculpture. Also, veins range in different sizes and shapes so you want to incorporate this into your design.

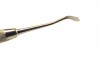
The tutorial below will walk you through the steps that I use to create veins for my sculptures. Remember that practice makes perfect so don’t give up if you do not get it right on the first try.

Read the rest of this entry »

Fiddler Sculpting Series

Posted by goregt On August - 9 - 2009

The Fiddler

sculpture of a fiddler

Ever hear Charlie Daniels “The Devil Went Down to Georgia” song? Well if you have a pulse and are over the age of twelve then you probably have. To make a long story short I thought I would do a sculpture based off of that song. Not that it is my favorite song in the world or that I’m Charlie Daniels number one fan (although I do think it is a pretty cool song), I just thought it would make an interesting sculpture.

I’m going to put together a series of tutorials for this sculpture where you can see step by step how the sculpture is created. Now keep in mind that at first the sculpture is not going to look like much but over time, as the series progresses, you should be able to see how I turn a block of clay into a unique piece of art. I think this will be a fun lesson for everyone and a great way to see how a sculpture comes to life. I will add links to the different lessons below so bookmark this site and come back frequently to see the latest lessons. It takes me over 100 hours to complete a sculpture so don’t expect this thing to be completed over night ;-)

Read the rest of this entry »

Adding veins to the arm

Posted by goregt On June - 24 - 2007

Finish blocking off the arm

In the previous lesson we built a solid foundation for the left arm. We are now at the stage where it is time to start adding all the little details. The steps in this lesson will build off of the rolling snakes and sculpting veins tutorials (I recommend visiting those
lessons first). We will not finish the sculpting on the arm in this lesson but
by the end of the page the left arm should look like it is getting close to
completion.

* This sculpture is created with Super Sculpey.

Read the rest of this entry »

Sculpting Fiddlers Hand

Posted by goregt On June - 4 - 2007

Sculpting the Fiddler’s Hand

I already have another tutorial about sculpting a hand with polymer clay but the images were taken with my old camera and I felt this was a good opportunity give an older tutorial a fresher look. I’m only going to create a rough hand since I will later attach it to the fiddle. Hands can be a little tricky to sculpt so the key here is to spend as much time as necessary to get the sculpting down correctly.

If sculpting hands come naturally easy to you then a big kudos to you. I myself still find the hands and eyes the most difficult things to sculpt. However, I have improved because I have invested those long hours making sure that I got everything down correctly.

Read the rest of this entry »

Sculpting Tutorials

Posted by goregt On March - 15 - 2007
Sculpting Tips and Tutorials
free polymer clay tutorials Sculpting Series
Â
polymer clay sculpting tips and tricks Sculpting Tips and Tricks

Polymer Clay Sculpting Tutorials

Wax Sculpting Tutorials

General Sculpting Tutorials (not specific to one medium)

Mold Making Tutorials

  • Making a Mold – Step One (New) – Introduction into the mold making process.
  • Mold Box

  • – Step Two (
    New)
    – How to make a mold box for a two piece mold.

Changing the design of the horns

Posted by goregt On June - 24 - 2007

Changing the design of the horns

sculpting horns in polymer clay
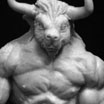
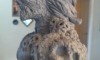
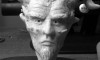
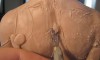
The original horns on this sculpture have been bugging me for some reason.  Although I was not finished with sculpting them, I just didn’t love the way I had designed them.  I have been wanting to change the horns around a bit but was not exactly sure what I wanted to do.

So after setting aside the original design for a few weeks I decided to tackle the horns one more time.  I like to make things up on the spot when I sculpt so the first step for me was to smooth out the original design and just start adding clay to the piece.

* This sculpture is created with Super Sculpey.

Read the rest of this entry »

Finish blocking off the arm

Posted by goregt On June - 17 - 2007

Finish blocking off the arm

In the previous lessons covering the arm on this sculpture the goal was to get a basic shape for the right arm.  Now it is time to start refining the shapes so that we can begin working on the details for the arm.

A lesson or two back I made a comment that the arm was going to look like a mess for awhile.  This is the lesson where the arm starts really looking like a muscular arm.

* This sculpture is created with Super Sculpey.

  1. Just as before I draw in lines to represent the individual muscles of the arm.
  2. I start adding a little clay here and there to bulk up the individual muscles.  The key is to make the upper arm flow naturally into the upper forearm.  I heavily rely on images off arms in this position during this stage of the sculpting process.
  3. I know the shape looks a little strange right now but in a couple more pictures it will all makes sense. See how I blend the muscles from the upper to the lower arm?
  4. Still bulking out the sides, front and back of my arm.  Right now I am only focusing on the upper arm and upper portion of the forearm.
  5. Very rough image but the progression is really coming along now.  All I have to do now is smooth and round out the muscles in the arm. Read the rest of this entry »

Using Alcohol on Polymer Clay

Posted by goregt On May - 31 - 2007

Using Alcohol With Polymer Clay

Rubbing Alcohol is a great tool that is used to help smooth and blend polymer clay when sculpting.  Like the Vaseline tutorial, I have several other tutorials where I give examples on how I use alcohol while sculpting (I’ve included a few examples at the bottom of this page).  When I first started sculpting I used water based clay (I had never even heard of polymer clay at that time).  With the water based clay I was able to achieve a smoothing and blending effect by using a wet sponge or Q-tip.  However, when I started using polymer clays, water did not have the same effect.  At first I tried to use water and Q-tip on my polymer clay but the results were pretty poor.  After doing a lot of research on the internet I discovered that rubbing alcohol dissolves polymer clays.  Thanks to other polymer clay artist I was able to learn that alcohol on a Q-tip, sponge or paint brush has the same effect as water on water based clay. I have experimented with different potencies of rubbing alcohol and found that not all are created equal.

Read the rest of this entry »

Rolling snakes

Posted by goregt On March - 21 - 2007

Rolling snakes in the clay

In a few of the other tutorials on this site I have referenced rolling snakes or cylinders of clay. These thin round pieces of clay are useful for sculpting a variety of things like veins, hair, small horns and different features of the face. I’ve included a picture tutorial below to better explain what I am talking about.

Read the rest of this entry »

VIDEO

Enter the video embed code here. Remember to change the size to 320 x 270 in the embed code.

TAG CLOUD

Recommended Sites

About Me

Nothing special, just a self-taught sculptor having fun with my art and showing all of you the tips and tricks I use to create my own artwork

Twitter

    Photos

    Activate the Flickrss plugin to see the image thumbnails!